JOIN THE STAMPIN' UP! FAMILY.

Whether for business or pleasure, contact me today to learn how becoming a Stampin' Up! Demonstrator can benefit you!

Monday 26 May 2008

Faux Metal

Last Friday night some lovely ladies came to my home & I taught them how to make Faux Metal. We had a great night & I thought I'd show you one of the cards we all made
The stampset used to make the flower is Pick a Petal. It was not one of my first choices in the new catalogue, but I am having so much fun with it.
We made the centre of the flower using the Faux Metal technique as well as some heat embossing on the flower petals.

Stampsets: Pick A Petal, Cheer & Wishes
Cardstock: Elegant Eggplant, Whisper White, Palette of Prints DSP
Ink: Versamark, Elegant Eggplant
Accessories: Silver Embossing Powder, Eggplant Grosgrain Ribbon

This is a sample card that I CASEd from Splitcoast Stampers

Stampsets: Baroque Motifs, It's Your Birthday
Cardstock: Night of Navy, Whisper White
Ink: Versamark, Night of Navy
Accessories: Gold Embossing Powder, Navy Grosgrain Ribbon, Gold Brads, 1/2 pearl from the Pretties Kit


and one more sample card - this one was so quick & easy.

Stampsets: Baroque Motifs, Heartfelt Thanks
Cardstock: Blue Bayou, Purely Pomegranite, Whisper White
Ink: Versamark, Purely Pomegranite, Old Olive, More Mustard
Accessories: Silver Embossing Powder, Pomegranite Double Stitched Ribbon

My next technique class will be on Fri 20th June, 7pm & will be on bleach. Come along & learn how to stamp, paint & alter your cards using household bleach. Cost is $12 for 2 cards & a sample with instructions for your technique book.

I haven't forgotten about the tutorial I teased you with the other day - it will be here soon :-)

Tuesday 20 May 2008

More ATC's & a Ribbon Share

Sorry, these are oldies & they even use a retired stamp set, but I have been busy & keep forgetting to take pics of my newest projects during the day. These were my ATC's for our watercolouring swap afew months ago. I folded the top layer of cardstock over & stamped the image twice, once on the outside & once on the inside. I then coloured the inside image & punched out a circle on the outside to give a sneek peek at the watercoloured image inside. A turn mount from my Hodgepodge Hardware keeps it closed & is easily turned so you can open it to check out the full coloured image inside.

Stampset: Longtime Friend (retired)
Cardstock: Choc Chip, Old Olive, Whisper White
Ink: Black Staz-on
Accessories: Stampin' Write Markers, Antique Brass Hodgepodge Hardware, 1 3/8 & 1 1/4 Circle Punches

This is a close up of the inside. I am not that good at watercolouring, but with the use of the great co-ordinating colours in the Stampin' Write Markers & an aquapainter, I was fairly happy with how these turned out.

Aren't these ribbons gorgeous! I am currently running an In-Color Double Stitched Ribbon share. You will receive approx 1.7 metres of each of the 6 colours of ribbon for $13 - that means you will be getting a total of 10.2 metres of ribbon & the price includes postage to anywhere in Australia. Please email me if you are interested in joining - alana@aussiebroadband.com.au

Sunday 18 May 2008

Bleaching

We all had a great time at the show - the kids loved the puppet show, lawnmower races & of course the motorbike stuntman, while I had fun checking out the pavillions. Stupidly I forgot my camera, so no pictures :-(


These are my latest efforts for the ATC swap I am involved with & I am really pleased with how they turned out. The technique this month was to use bleach - I was rather nervous about this as whenever I use bleach in the laundry it's a disaster, however I am happy to say that stamping with bleach super easy. I filled one of my aquapainters with bleach & then applied it to the back of the stamp, then stamped! The bleach will take the colour out of the cardstock & each different colour cardstock will give you a different result. I have stamped the horse onto Basic Gray & it changed the cardstock colour to one very close to River Rock. I have also run the bleach filled aquapainter around the edges of the basic gray cardstock. I will be running a bleach technique class in the future, so if you are interested in learning how to do this, keep an eye out for the dates.

Stampset: Wanted, Occasional Greetings, Sanded Background

Cardstock: Basic Gray, Basic Black, River Rock

Ink: Basic Gray, Basic Black

Accessories: Vintage Brad, River Rock Double Stitched Ribbon, Cutter Kit, Bleach filled Aquapainter

Thursday 15 May 2008

a CASE of CASEing

You may remember these cards that I CASEd from Jayne awhile ago. I really loved the layout & especially the distressing on the layers, so decided to CASE it again using some NEW products & colours from the 08-09 Stampin' Up! Idea Book & Catalogue.
Here is the resulting card - the picture doesn't show it up very well, but the rhinestone brad in the centre of the flower is gorgeous.

Stampset: Spring Solitude (new hostess set)
Cardstock: Wild Wasabi, Groovy Guava, Really Rust & Whisper White
Ink: Wild Wasabi, Groovy Guava, Black Staz-on
Accessories: Groovy Guava Double Stitched Ribbon, Circle Fire Rhinestone Brad, Cutter Kit, Mat Pack & Paper Piercer.
If you would like any more details on how I made this card just send me an email - alana@aussiebroadband.com.au I have been working on some ATC's, scrapbooking pages & tutorials so am hoping to get back & show you some of them soon - may not be for a couple of days as we will be at the Wee Waa Show tomorrow & Saturday. This is a highlight on the local calendar & the kids are really looking forward to it.

On a non crafting note we have been getting psyched up for mini camp lately with abit of riding.
I think this was Josie's first REAL ride with a saddle etc & she thought it was great ........ until the pony decided to have a shake. Luckily I caught her foot just as it was slipping over the top of the saddle, so no harm done & she is keen to ride again :-)

Thursday 8 May 2008

The Domino Effect

Did you know that dominoes are not only good at teaching your kids how to count, but the are also great for mounting stamps!

This is one of our fantastic new hostess sets, So Many Sayings, it has 34 lines with little greeting etc on them. It comes with 3 wooden blocks for them to be mounted on, however I have mounted mine onto dominoes. Not only does this make it alot more versatile, but they are so easy to line up when stamping & still all fit into the box! My kids won't be counting with these ones anymore - luckily I bought 2 sets when I was in the reject shop the other day. FYI it takes one whole set, plus 6 extra from the kids set to mount all the stamps in So Many Sayings individually!!


I made this card for an INKlings card swap, but am not entirely happy with how it turned out. I have used the poppin' pastels technique for the bucking horse & was happy with that, but the rest of the card is abit of a disaster-sorry to the girls in the swap :-( The only reason I am posting it here is because it is the only card I have a pic of that uses So Many Sayings!

Stampsets: Bronc Buster, So Many Sayings

Paper: Choc Chip, Really Rust, Sahara Sand, Outlaw DSP

Ink: Versamark, Choc Chip

Accessories: Antique Brass Brad, Stampin' Pastels

Sunday 4 May 2008

Faux Metal ATC's

There are my latest ATC's for a swap I am in, they use a really cool technique called Faux Metal. If you are interested in learning how to do this, then come along to my technique class on Friday 23rd March, 7pm. Cost will be $12 which includes a sample for your technique book & two cards.


Stampset: Baroque Motifs

Paper: Choc Chip, Whisper White, Celery Designer Series Prints

Ink: Certainly Celery, Versamard

Accessories: Embossing Buddy, Gold Embossing Powder, Heat Tool, Crop-A-Dile, Corner Rounder, Ice Circle Rhinstone Brad

and the winners are ................

diane s

bunny b

Katheryn M

Congratulations, I will email you shortly to get your addesses & post of your triangle box & ribbon sample. Thankyou to everyone who left kind comments also!

Saturday 3 May 2008

Card Compendium

Thanks to everyone who left lovely comments on my Crop-A-Dile tutorial. I will not be taking any responsibility if you now feel the compulsion to buy one of these beauties, I will however suggest you use a decoy address put your hubby off the trail. I may need to do this soon, as my wonderful hubby was complaining to the postie the other day about how many parcels we've been getting - I keep telling him they are all customer orders, but I don't think he's buying that story ;-)


Anyway............as promised here is the project that I used the Crop-A-Diled embellishment on


One of the clever ladies from the American Stampin' Up! office showed us this cute card compendium at Convention.

Inside it holds 3 cards & envelopes. I CASEd these cards from Kerri & they were so quick & simple to make


Although each card is the same, they have different sentiments stamped on the left, making them very versatile.

Stampsets: Baroque Motifs, Cheer & Wishes, Spring Solitude

Inks: River Rock, Purely Pomegranite, Versamark

Cardstock: Whisper White, Sahara Sand, Choc Chip, Purely Pomegranite

Accessories: Double Stitched Ribbon, Circle Scalloped Punch, Circle Punch, Crop-A-Dile, Jumbo Antique Brass Eyelets, Antique Brass Brads, Hemp Twine

The kids will draw out the blog candy winners tomorrow lunchtime - so make sure you leave your comment on this post to be in the running to win a triangle box & ribbon sample.

Friday 2 May 2008

Crop-A-Dile Tutorial

My favourite tool out of the new catalogue is without a doubt the Crop-A-Dile. This tool can punch a hole through anything with ease - cardstock, chipboard, CD's, tin & leather. It also sets small & jumbo eyelets & also dry embosses circles on cardstock (I have also heard it will do this on chipboard & CD's, but haven't tested it out yet). One of the really cool things you can do is set two eyelets, back-to-back, to create a 'grommet', which is great if you are making a project that you can see both sides of - no more messy eyelet backs to look at!


Above are the items that I used - my Crop-A-Dile, 2 Jumbo eyelets, a scalloped circle punched shape & 2 circle punch shapes.


Firstly I attached the punched out shapes together as above - the 2nd circle is on the other side.


Now comes the fun part. Using the 3/16 hole punch on the side of the crop-a-dile punch a hole where you want your eyelet to go - it is really easy to see through to exactly where the hole will be. Just a small tip - if you are wanting to set one of our jumbo eyelets you will need to punch a 2nd hole, just slightly to the side of the first one, as the eyelets are a tiny bit bigger than the actual hole made. If you are only using one sheet of cardstock or DSP you won't need to do this, however if you are using anything thicker - 3 sheets of cardstock (like I am), chipboard, tin etc you will need to make the hole abit bigger.


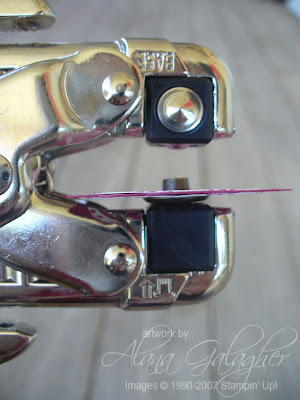
These are the 'jaws' of the Crop-A-Dile, on the top you can see it has written 'base' - this side is used to set the back of you eyelet, on the bottom there is a picture of an eyelet & an arrow showing which way to sit the eyelet on the jaw.


Now to actually set the eyelet - if you can see in the above picture, the eyelet is face down on the bottom with the paper on top. For jumbo eyelets the base setting I use is '1' & the eyelet side setting is 'A'. To set you simply squeeze the Cop-A-Dile closed - it will set perfectly every time, no mess, no noise & most importantly no fuss.

I want to set another eyelet on the back to make my 'grommet' so have put the second eyelet on the bottom jaw of the Crop-A-Dile, turned my project over & placed it on top. The 2nd eyelet won't actually fit inside the 1st one just yet, but once you squeeze the mighty Crop-A-Dile jaws it will.

You will be left with a project looking like this & if you turn it over it looks just the same :). Check back tomorrow & I will show you the finished project that I used this cute embellishment on!